Rooting and custom Firmware on the HTC Desire HD

Warning:
Doing anything below will void your warranty.
Any damage to your phone due to any of this is your own responsibility, not mine nor the ROM developers.
Don’t venture into flashing of ROMS if you don’t know what you’re doing.

After HTC decided to push Android version 2.3.7 with HTC Sense 3.5 to my HTC Desire HD, I’ve had major problems with my phone. I do know that I could have just decided not to update, but I like being on the ‘cutting edge’ of it all (so much at the cutting edge as you can be with an older version of the Android OS).

The thing is that it seems HTC Sense 3.5 uses way to much of the precious hardware of my phone for it to work properly, at least if we look at the stock version of Android 2.3.7 and HTC Sense 3.5. That is why I decided to venture into rooting and flashing a custom firmware on my phone.

First of I had to found out how to root the phone and as it is there is no way to permanently root Android 2.3.7 on the HTC Desire HD. Luckily there is something called The Advanced Ace Hack Kit, which allows you to do a temporary root and downgrade the system to 2.3.5 where we get to do a permanent root.

It also installs Fastboot, which is a protocol used to update the flash filesystem via USB, and ClockworkMod Recovery, which replaces the stock recovery console and gives you more options.

It is the latter that is important when you want to install custom ROMS on your phone. It’s actually rather simple going on from here, now it’s just a matter of making a NANDroid backup of your phone from ClockworkMod Recovery and then find the ROM you’d like to experiment with. For the Desire HD I was looking around on the XDA Developers forum and found a few ROMS I’d try out.

Also the andrdcndy blog had a nice list of ROMS to check out.

I decided on trying out IceColdSandwich by LorD ClockaN for my first go, as it was an Android 4.0.3 ROM without HTC Sense. I really wanted to try something new after 1½ year of HTC Sense, so stock Android it was.

I started out with IceColdSandwich 5.5 and it was actually running pretty good. Some people have issues with the camera on the Desire HD with this ROM, but mine seemed to function as it should. I had maybe 1 crash on 5.5, but when update 6.0 came out my phone really started suffering with loads of random crashes, especially when I was on the phone with someone. Also after updating from 5.5 to 6.0 I started having camera issues and the fix provided didn’t help me out. Update 6.1 didn’t really make it better for me, so I started looking around to try something new (again).

Actually I liked IceColdSandwich a lot, but the random crashes was annoying and I really did change from the stock 2.3.7, with Sense 3.5 due to performance problems. Also the fact that there was no Danish T9 was a hassle when most of the communication you do on the phone is in Danish. A random keyboard crash when pressing the buttons L and I after each other didn’t help the impression and you actually do this a lot when writing Danish. Lastly sending and receiving MMS wasn’t possible on the stock messaging app, which meant I didn’t received a nice picture of my two nieces, which my sister sent.

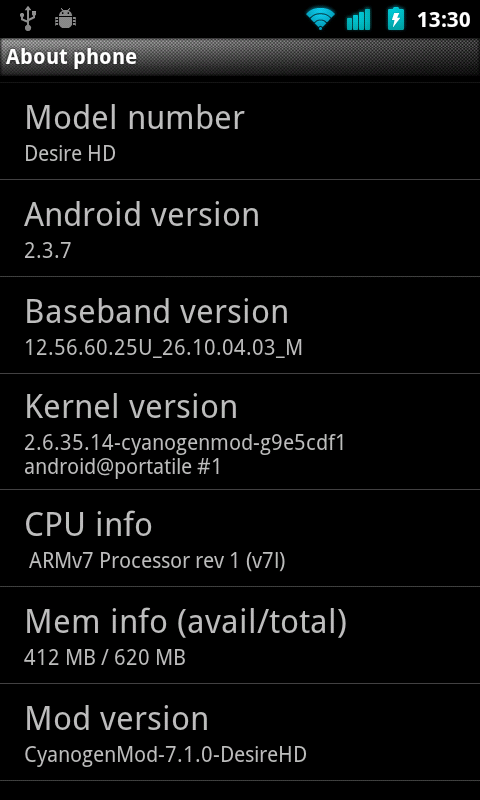
This meant that I took a closer look at CyanogenMod, which is said to be one of the more stable ROM releases. Currently I’m on CyanogenMod 7.1.0 and everything is just running great out of the box. It’s built on Android 2.3.7, but without HTC Sense, which means I get great performance.

So far, I can’t really say anything bad about CyanogenMod, as it just works. No random crashes at all and after installing the the different Google Apps (gapps), which you can find here, it started out being just as I wanted it. It even automatically installed all my apps from the market without any other interaction from me than asking.

If you click the CyanogenMod logo below, you can see two screenshots from the ‘About phone’ part in the settings menu and see these from my phone for the two above mentioned ROMS.

I might return to the blog with more updates as I experiment with custom ROMS.

Playing around with docks in Ubuntu

After growing a bit tired of the regular Gnome interface I thought that I would spice it all up by trying to ad a dock to hold all my launchers and such. This made me go search for all kinds of different possibilities and as always the Ubuntu Forums is a great place to start looking for something. Never have I met a community which is so friendly and eager to help when you have some trouble with a component or maybe need advise to figure out what you should do.

After hunting around, I came up with three different alternatives I would try Docky, AWN and CairoDock.

So far I’ve been playing around with Docky and AWN, but am still waiting to try me luck with CairoDock. I’ll share how you install AWN (as that is how far I’ve gotten with my project so far) and also look at how easy (or not) I found it:

At first I had problems with getting more than one dock in AWN, which I really couldn’t understand. I had seen several nice screenshots of other peoples user interfaces and they had somehow managed to get it done, but no matter what I did in the settings, I just couldn’t figure out what to do. After some searching however, I did manage to find a post that gave me the possibility to do exactly what I wanted.

I did however mean that I had to make sure that I got rid of the old installation of AWN, as it wasn’t available in the regular Ubuntu repositories. You need to use the AWN from the AWN-testing PPA.

First you remove the one you might have installed already by opening your terminal and entering the following:

sudo apt-get remove avant-window-navigator avant-window-navigator-data awn-settings awn-applets-c-core libawn1 vala-awn && sudo apt-get autoremove

This removes the core packages that AWN is using and by adding the ‘sudo apt-get autoremove’ you remove all the unused dependencies too, so you don’t have any unused packages that might conflict when you are going to install the AWN trunk.

Now we have to add the AWN-testing repository, so we get the possibility to install it and also update later on:

sudo add-apt-repository ppa:awn-testing/ppa

Now do an update to allow you to get the contents of the PPA:

sudo apt-get update

Now we have all the packages we need avalible to play around with AWN, so now we execute the following command in the terminal:

sudo apt-get install avant-window-navigator-trunk avant-window-navigator-data-trunk python-awn-trunk awn-settings-trunk awn-applets-python-core-trunk python-awn-extras-trunk awn-applets-python-extras-trunk awn-applets-c-core-trunk awn-applets-c-extras-trunk

Now we’re almost done installing AWN, but to make the different helpers work, we have to install DockManager which luckily is included in the PPA for AWN:

sudo apt-get install dockmanager-daemon dockmanager

With this last install, we now got everything we can to start playing around with AWN. Simply start up Avant Window Navigator from your menu by clicking ‘Applications’ -> ‘Accessories’ -> ‘Avant Window Navigator’. This gives you a standard bar, with a few things on it. The standard launchers you’ll have is the AWN control panel, a terminal, Firefox and Rythmbox.

I’ve made a little slideshow you can where you can see the five different settings tabs you have available in the AWN settings, simply start it by clicking the AWN logo below:

It is here you make the action that is setting up AWN to your needs. You can chose all the usual things that are available for such an application, amongst others the size of the icons, the orientation of the bar (do you want the dock in the bottom, the top or maybe even on the side?), the style of how the dock acts and so on. It is also here that you decide what helpers and applets that you want to run on your docks.

Below you see my main dock, which has no unusual applets or anything on it. It’s just a standard dock with the currently running applications:

My main AWN dock

As I mentioned it’s not very interesting, but the only thing I do from this is launch applications and swap between them and as you can see I’m still in the progress of setting them up. Thus, I’ve not gotten very far with it, but I’m still working on it and I will show you the progress in a later post when I’ve made my final decision on what dock to run.

I have added another dock so far, this one is containing some of the different informations I like to have at hand when using my computer. It’s nothing special, but still I find it useful so far:

Another dock!

As you can see I have a gMail applet running that shows when I get new mail (the star shows that I actually have unread mails). Next to it I have the notification area, that show when someone message me, Gwibber and the likes. I like knowing how the weather is, even though I’m sat right next to a window looking out and I can tell you right now that I’m having some connectivity issues as it’s most definitely not 5 degrees Celsius and sunshine outside. I’ve also added a network monitor, which underlines my connectivity issues, as there is no traffic what so ever going on at the moment. Finally the date and time, which has become essential for me as I need to know when I have to go to bed…

That is my current set-up after playing with AWN for 30 minutes time (not counting all the time it took me to find out that I needed the AWN-testing PPA) and as you can see it’s all very basic and simple so far. It will probably evolve later on when I’ve gotten more comfortable with it, but I think it’s rather simple to find the helpers I’ve needed for now. I can’t yet tell how hard it is to find special applets and helpers yet, but I will chime in when I know.

I hope this could answer a few questions on how to play around with AWN and start your own journey into nice docks in Ubuntu. Feel free to comment, point me towards better alternatives or what not, as I’m always open to some constructive criticism and suggestions.